Feature news

Showing posts with label Windows Tricks. Show all posts

How to automatically redirect Blogger blog to another blog or website

How To Automatically Redirect A Blogger Blog To Another URL

A few posts back we made an article about Blogger custom redirects in which you can redirect within your blog. That is you can redirect your specific post URL to another post or page, all 301 or 302 redirection within your blog. That will be useful for redirecting 404 error pages and broken links; however with that you cannot redirect homepage to any particular URL. Here we will show you how to automatically redirect Blogger blog to another blog or website or any URL. So with this technique you can redirect your Blogger Homepage or any particular page to external websites.

When to use this?

This one will be useful if you have just migrated to new domain with new blogging platform. You are always limited in Blogger that’s why people moving to self-hosted wordpress blogs. Usually you won’t get much traffic to your new blog when you just shifted. Also your old blog will have some decent traffic flow from organic search results as well as from backlinks. So by using this method you can drive traffic from your old blog to your new blog and also it passes all the ranking factors.

How to redirect Blogger blog to another blog / URL / Website

Here we will share three different codes that automatically redirect Blogger blog to another blog or URL and each code does different tasks.
Let’s say you want to redirect your complete Blogger blog to another page or URL. That is redirecting your homepage, posts page, archives page and all other URL in your blog to another specified external website. You have to use this if you just moved to new domain. To do this you are going to make changes to your template file. So before you mess up with the codes it’s recommended that you backup your template first.
  1. Login to your Blogger dashboard
  2. Go to template and click edit HTML
  3. Now you can see template codes. Press CTRL + f and then find <head>
  4. Now add the following code below head tag like you see in the image below.


1<script type='text/javascript'>
2  var d='<data:blog.url/>';
3  d=d.replace(/.*\/\/[^\/]*/, '');
4  location.href = 'http://www.pcsoftwareclub.com';
5</script>
In the above code change http://www.pcsoftwareclub.comwhich is the destination URL. Now all your pages from the blog will be redirected to destination URL.
Now we will see another piece of code that redirects particular blog URL to another blog or website. If you wish not to redirect the whole blog then you have to make use of this code. Also you can use this for redirecting user from a particular page to another external website for promotional purpose.
To do this just paste the following code below head tag and change the from URL that is http://yourblog.blogspot.com and destination URL that is http://www.pcsoftwareclub.com
1<script>
2if(window.location.href == 'http://yourblog.blogspot.com ')
3{
4window.location="http://www.pcsoftwareclub.com";
5}
6</script>
The above code just redirects user from the specified BlogSpot URL to another website or URL.
Here comes another code; with this you can redirect all your blog pages including home page to another blog or website with specific set time. So users who lands in your blog will be automatically redirected to anther blog after a specific time period.
1<meta content='5;url=http://www.pcsoftwareclub.com' http-equiv='refresh'/>
This is the code, just copy and paste below the head tag in your template file. In the above code 5 is the set time where users will redirected to http://www.pcsoftwareclub.com in 5 seconds after landing.
Hope this article guided you on how to automatically redirect Blogger blog to another blog / website or URL. Share this and if you found it useful then please leave your comments. 


Learn more »

How To Approve AdSense In Five Minute After Disapproved

After that My adsense was approved. Adsense being disapproved doesn't meant you aren't able to re-apply but if once you create an adsense hosted account you will able to approve again your all disapprove adsense account  by hosted account .


Hello Bloggers!
My previous Adsense application disapproved because the web site which I applied for Adsense is not older than 6 months.
Anyway it is very close to complete 6 months for my Blogger  account. So I decided to use the hubpages account to apply for Adsense once it completed 6 months.
Now the problem is in the Google Adsense configuration page shows as follows.

You may not apply for Google AdSense through Blogger because of the following issue:
      It appears that your Google AdSense Application, with the publisher id ca-pub-xxxxxxxxxxxxxxxx has been disapproved by Google. You should have received an email from Google explaining why. You can make any necessary updates to your application and resubmit by signing in to the Google AdSense Home Page using the email address and password you provided with your application.


How To Approve See SS And Video

1.Here Is veersoni2010@gmail.com Owner Of veersoni2010.blogspot.com  Is disapprove by adsense


2.Go To Setting And give Admin Permission To A Hosted Account Owner Of Adsense
Here  I give Permission to anonkarad@gamil.com who is a hosted adsense owner.


3.Go to hosted account blogger and Earning And Switch AdSense Account

4.Chose Only Hosted account Not Any Other Account (there anonkarad@gmail.com a hosted adsense account )

5.Accept Association


6.Congratulation The AdSense Account Approved On Disapproved Account


Please Share My Video Or Post  And Subscribe My Youtube Channel


  THNKS FOR    Visit My Site

www.pcsoftwareclub.com
Learn more »

Trick to Send Page Invites to all Friends In Just One Click 2015

Working JavaScript to Send Automatic Facebook Page Invites to all Friends 2015

The ability to run various JavaScripts against Facebook’s interface has really helped in making tasks simple as well as has given rise to Facebook Spam. Although these scripts are not new and were discovered long back, we did missed to post about it due Privacy concerns. So here we are posting all kinds of Facebook Scripts and for today we posting updated and optimized JavaScript to send automatic Facebook Fan-page invites to all your friends.
The Biggest challenge after creating Facebook Fan-Page for your brand is to actually acquire Fans (Likes) that have interest in your brand or build your Brand interest among people. While to build this audience Facebook provides advertising schemes, these schemes might cost a lot. The easiest way to get fans that all the Admins or Social media service providers follow is to just Invite your own friends. Yes you can do this, but you have to send invites to your each friends individually by clicking Invite button for each.
And this is where it becomes difficult and boring to click Invite Buttons all the way down until you reach your last friend on the List. To make this task easier, we will employe a piece of JavaScript code that will automatically send Fan-page invites to all your friends within few seconds. So lets get started with it.

Trick to Send Fan-Page Invites to all Friends:

[ * ] This tricks only if you are the Admin of the Fan-page.
  • Copy the JavaScript code given below:
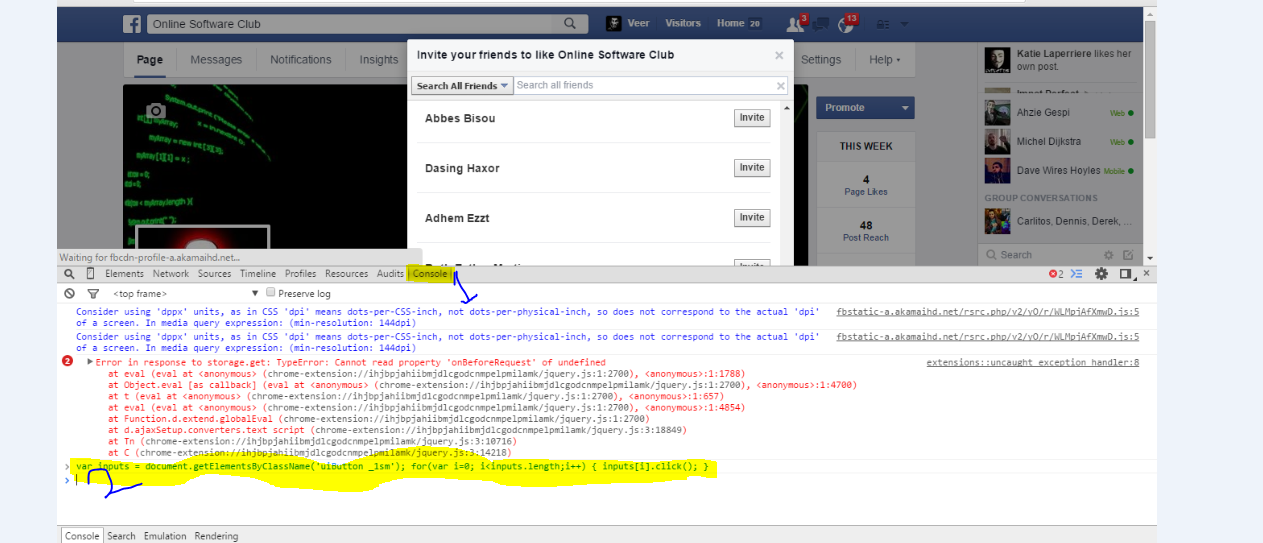
var inputs = document.getElementsByClassName('uiButton _1sm'); for(var i=0; i<inputs.length;i++) { inputs[i].click(); }
    • Open your Facebook fan-page (Use Chrome Web-Browser). Click Build audience >> Invite Friends (located at the top-right corner of the page)

    • A new window will open up Which will list all your Friends along with Invite buttons inline with the friends name. Just Scroll down till your reach end of the list or till it stops loading.

    • Now Press F12 Button on your Keyboard to open up developer options.(In Google Chrome f12 And In firefox Shift+Ctrl+K)


    • In the developer options click Console Tab and paste (ctrl+v) the JavaScript code that you copied in the 1st step. Hit Enter key.

    • Now sit back and relax. The Script will automatically click Invite buttons on behalf of you and within few seconds you will see that you have successfully invited all your friends to your Fan-Page.

    • If you face any problems or have anything to say, just write in as a comment below and will revert back asap.

    WATCH VIDEO FOR LEARN ESSY WAY


    Learn more »